Overview of a Pedigree
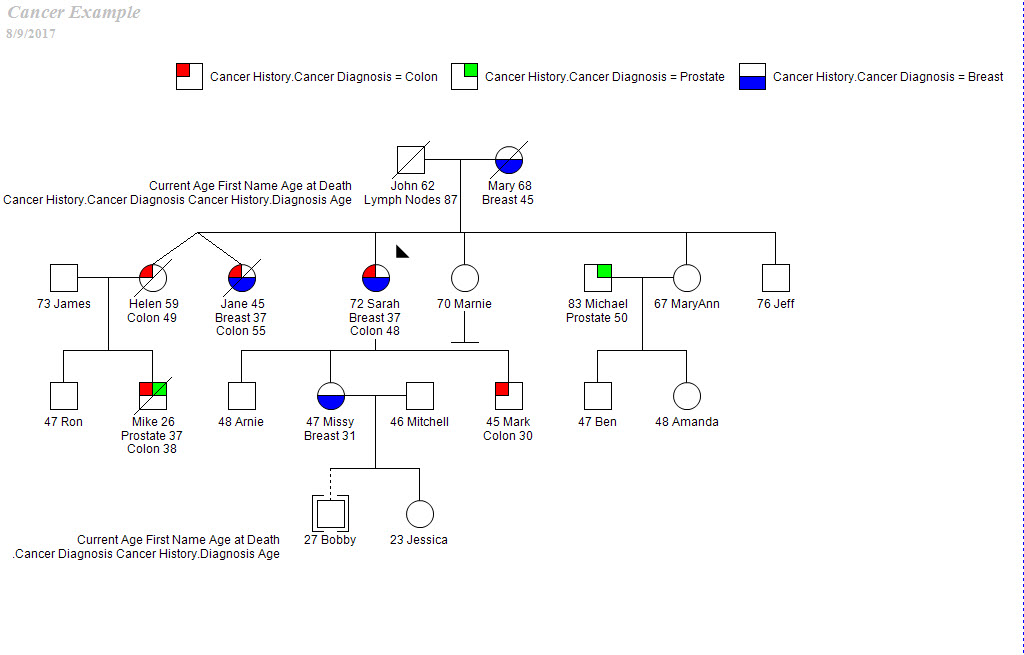
A pedigree, also known as a genogram, is a diagram that depicts individuals who are related by blood or another factor. Different icons represent different types of individuals. For example, a square icon indicates a male individual, a circle icon indicates a female individual, and a diamond icon indicates an individual of unknown/undetermined gender. Symbols are applied to icons to graphically represent data about the individual, such as individuals with a cancer diagnosis that equals Breast. A legend identifies each symbol. The lines connecting individuals identify the relationship between two individuals, such as marital status. The icon subtext, which is the text that is displayed above or below an individual icon on a pedigree, is specific for the individual. Figure 5-1 below shows a pedigree that details the cancer history for the members of a family.
Overview of Pedigree Icons
Although there are no definitive standards when drawing pedigrees, there are published guidelines for the human genetics market. Progeny uses pedigree icons based on the guidelines published in the American Journal of Human Genetics (1995) Bennet, et al.

Pedigree Properties
The Properties dialog box displays all the options that you can set for controlling the drawing and display of a pedigree. It is important for you to become aware of the different options so that when they are referenced later in this chapter, you are able to correctly modify and apply the properties when you are drawing pedigrees. You can open the Properties dialog box by clicking on the Properties button on the toolbar for any opened pedigree.
![]()
The dialog box has five tabs – Progeny, Pedigree, Individual, Line, and Dimensions. By default, the Progeny tab is the active tab when the dialog box first opens.

| Option | Description |
|---|---|
| Show Grid | Displays a grid on the pedigree canvas. |
| Snap to Grid | When moving an icon on the pedigree, aligns (or “snaps”) the icon to the nearest intersection of lines in the grid, even if the grid is not visible. |
| Show Page Breaks | Displays print boundaries on the pedigree as blue dashed lines. |
| AutoDraw | Automatically runs Smart Draw every time you add an individual to a pedigree. You can then define your Smart Draw options. |
| Live Dragging | Relationship lines move with the icon when you reposition it. |
| Show Symbols Legend | Displays a legend for the symbols shown on the pedigree. |
| Show Subtext Legend | Displays a legend for the icon subtext displayed in the pedigree. |
| Show Markers Legend | Displays a legend for the icon markers displayed in the pedigree. |
| One-click Add | Allows you to click on specific handles on an individual icon to automatically add a relationship to the individual. (You do not have to manually add relationships from the palette or drag lines between icons to create relationships). |
| Show Header/Show Footer | Displays a header or footer on each page of the pedigree. Customizable from the Pedigree tab of Properties menu. |
| Show Haplotypes | Displays a color-coded legend for markers that are displayed on a pedigree. |
| Display Translated SNP Allele Values (read-only) | Displays the SNP allele values next to the individual’s icon. |
| Show Linkage Selections | Displays sample status (Sample/Plate/Genotype) on the pedigree and indicates whether an individual has been “Included in Analysis.” |
| Autosize Subtext based on Data | Dynamically resizes the icon subtext based on the quantity of text entered for an individual. |
| Show Invite Status | Displays questionnaire invite status |
| Show Generation Number | Displays numbers next to each individual in the pedigree indicating which generation they belong to |
Pedigree tab

| Option | Description |
|---|---|
| Icon Subtext Font | Ability to change subtext font and size. |
| Line Width | Allows adjusting the thickness of the relationship lines used in the pedigree. |
| Pedigree Scale | Allows the user to change the Pedigree scaling size. |
| Horizontal & Vertical Grid Spacing | Allows the user to change the Horizontal and Vertical spacing on the grid. |
| Proband Arrow Position | Ability to move the proband arrow position to one of the four corners of the proband’s icon. |
| Show LOD Scores | Displays a table with LOD (logarithm of the odds) scores for the markers that are listed for each individual. |
| Use Hooks | Displays hooks on pedigrees to differentiate relationship lines. |
| Show Blue ID# | Displays blue numbers for individuals in each generation of pedigree. |
| Show Date | Displays date on pedigree. |
| Header & Footer | Allows users to customize Headers and Footers. |
| Smart Draw Options | Gives user ability to change Smart Draw settings. (Match Spouses, Change Vertical Positions, Conserve Left Space, Recalculate All Positions, and Force Father to Left) |
Individual tab

| Option | Description |
|---|---|
| Gender | Change the gender of the selected individual. |
| Attributes | Select the attributes for the selected individual. |
| Adopted | Indicate the adoption status for the selected individual. |
| Marked By | Place the indicated symbol next to the selected individual. |
| Individual Name | Every individual in Progeny is assigned an individual name (a system field). When you are drawing a pedigree in Progeny the software automatically assigns an individual name to an individual. The default format for the Individual Name is ‘pedigree name’ + ‘_UPN’ with the UPN (unique person number) being an incremented number for each person added to the pedigree. If needed, you can edit this default name here. |
| Icon Text | Enter a text that is to be displayed inside the individual icon. The text can be alphanumeric or special characters. |
Line tab

- Spouse Relationship – Applicable only to a selected spouse relationship line. The displayed line indicates the relationship between the spouses.
- Normal
- Separated
- Divorced
- Casual
- Consanguineous
- No Issues
- Infertile
- Twin Relationship – Applicable only to a selected twin relationship line. The displayed line indicates the relationship between the twins.
- Dizygotic
- Monozygotic
- Unknown
Dimensions tab

| Option | Description |
|---|---|
| Individual Space | The space between individual icons in a pedigree. |
| Icon Size | The size of the icons that represent individuals in a pedigree. The Square Icons option locks icon height and width to identical values. |
| Dimensions manual adjust window | You can also manually adjust the individual space and icon size. To adjust the size of the individual icons, the spacing between them, and the distance from the subtext, simply click and hold your left mouse button on the corresponding line in the manual adjust window until the cursor changes to a double-headed arrow, drag the line to the desired distance, and then release the button. |
Right-click on the Pedigree canvas to see these options:

| Option | Description |
|---|---|
| Add Individual | Adds a new individual to the pedigree |
| Smart Draw | Match Spouses – Keep spouse pairs as close to each other as possible.
Change Vertical Positions – Aligns all individuals of the same generation horizontally. |
| Individual Palette | Uses the palette to add individuals to the pedigree and assign relationships between individuals |
| Save | Saves the pedigree. |
| Select All | Selects all individuals in the pedigree. |
| Reverse Select | Deselects individuals that were selected and select individuals that were not selected. |
| Copy/Paste | Copy & paste from the pedigree into another document. |
| Add text | Adds free text to pedigree. |
| Print Setup | Opens printing options for the pedigree. |
| Prints the pedigree. | |
| Fit to Page | To automatically scale the pedigree to print on a single page. |
| Show Thumbnail | Displays smaller window of the pedigree. |
| Save as XML | Saves the pedigree as an XML file. |
| Load from XML | Loads a pedigree from an XML file. |
| Save as Picture | Saves the pedigree as an image (JPEG, TIFF, PNG, GIF, or BMP). |
| Risk Analysis | Exports the pedigree to Risk Analysis models for testing. |
| Properties | Open the properties window. |
| Mark Pedigree | Option to turn on/off Auditing for the pedigree. |
| Add Sample | Option to add a sample individual. |
To print a pedigree
- Open the pedigree you want to print then click the Print button in the top-left corner of the icon menu.

- You can optionally set one or more of the following options:
- Turn on the Show Page Breaks option within the Progeny tab of the Properties dialog box. (See Properties dialog box, Progeny tab) If this option is selected, blue lines will be displayed on the pedigree viewer to show where the page breaks into another page. Page numbers are displayed in the bottom right corner of each page once printed.

- Landscape is the default mode for printing. To change this, on the main menu, in the upper left-hand corner, click File > Printer Setup, and on the Print Setup dialog box, select Portrait.


- To automatically scale the pedigree to print on a single page, right-click on the opened pedigree and choose Fit To Page. To return the pedigree to its original scale, enter the appropriate value for the Pedigree Scale option on the Pedigree tab of the Properties dialog box. (See Properties dialog box, Pedigree tab)

- Turn on the Show Page Breaks option within the Progeny tab of the Properties dialog box. (See Properties dialog box, Progeny tab) If this option is selected, blue lines will be displayed on the pedigree viewer to show where the page breaks into another page. Page numbers are displayed in the bottom right corner of each page once printed.
- On the pedigree toolbar in the upper left corner, click the Print button. The Print dialog box opens.
- On the Print dialog box, select the needed printing options, and then click OK.
To create a sub-pedigree
- Open the pedigree for which you are creating a sub-pedigree.
- Select the individuals you would like to create a sub-pedigree for.

- On the Pedigree Drawing window toolbar, click the New SubPed button. The New Pedigree dialog box opens.

- Enter the name of the new sub-pedigree and choose the folder where it will be added to.
- Optionally, click Open on Save. If you select this option, then after you save the pedigree, the sub-pedigree opens in the Pedigree Drawing window.
- Once the new pedigree has been created click OK to close the message and open the sub-pedigree in the Pedigrees Drawing window.
Icon Subtext
- Click the Icons button from the top menu then click the Fields button inside the Subtext tab of the new Icons window, which is displayed to the left, to open the Fields dialog box.


- Drag each field that is to be displayed in the icon subtext from the Fields dialog box to the lower part of the Subtext tab. When you are dragging the fields, note the following:
- The order in which you drag the fields into the subtext configuration menu does not matter. You can use the Row column to the left of the field to configure the vertical placement (1 = top row) and the Order column to configure the horizontal placement (1 = left-most).
- You can use negative values in the Row column (e.g. -1) to have a subtext row display above the pedigree icon.
- You can display table fields in icon subtext. When you drag a table field from the Field dialog box to the Subtext tab, all the table subfields are included under the table name. To include a table subfield in the icon subtext, enter a number into the Order column for that particular subfield. If you drag a lookup table to the Subtext tab, then only the lookup table field is displayed on the tab. The lookup table subfields are not displayed.
- If your data is too long/verbose to display under an icon, you can either turn on the Autosize Subtext based on Data option within the Properties dialog box, Progeny tab, or adjust the pedigree’s Smart Draw dimensions to allow for the extra horizontal spacing from the Properties dialog box > Dimensions tab.
- If you add a field in error or decide that you do not want a field incorporated into your subtext, select the field, and click the Delete button.
- After you have ordered the icon subtext, click the Apply button.

- When you have finished constructing your subtext format, click the Save button within the subtext configuration window to save this as a subtext format
- Icon Symbols:
- Click the Icons button from the top menu.
- Click the Symbols tab within the Icons window
- Click the Fields button inside the Symbols tab to open the Fields dialog box.

- Drag each field that is to be represented by a symbol from the Fields dialog box to the blank Symbols tab. When you are adding fields, note the following:
- You can create symbols for any database field (including System Fields) and/or define a symbol to represent ranges or queries such as individuals with a current age > 50.
- The order in which you drag the fields is the order from top to bottom in which the symbols are applied to the icon. You may need to experiment a bit with your field orders because when an individual has too many active symbols, they can cover each other.
- If you select a table field, then the Select Symbol Row Field dialog box opens. This dialog box lists all the table subfields. You must select the table subfields that are to be used as symbol rows. If you select a lookup table field, then only the lookup field is added to the Symbols tab. The lookup table subfields are not.
- You can select the same table field multiple times in order to apply symbols for each individual subfield that is within that same table field. For example, if you are creating a pedigree that shows the cancer history for a family you could drag the Cancer History field multiple times to apply the symbols for Cancer Diagnosis subfields: Cancer Diagnosis = Colon, Cancer Diagnosis = Prostate, and Cancer Diagnosis = Breast

- After you have determined which fields you want to display symbols for and have added them to your Symbols configuration menu, do the following for each field:
- Click on the left-most column (Symbol) to open a dropdown list from which you can select the symbol to be displayed for each field.
- Click on the Operator column to open a dropdown list from which you can select the logical operator for the field.
- Enter into the Field Value column the data you want a symbol displayed for.
- If you have specific requirements for the Symbols Legend or just do not like the default Symbols Legend display schema (e.g. Cancer History.Cancer Diagnosis = Breast OR Current Age >30) you can use the Custom Legend Label column on the far right to enter a personalized label which will be displayed on the pedigree Symbols Legend Using the two examples in the previous sentence, we could set up our Symbols Legend to instead display easy to understand language for the symbols like Breast Cancer instead of Cancer History.Cancer Diagnosis = Breast or you could configure Patient over 30 instead of Current Age > 30.
- Click on the left-most column (Symbol) to open a dropdown list from which you can select the symbol to be displayed for each field.
- If you add a field in error or decide that you want to delete a field, select the field and click the Delete button.

- After you have selected all the necessary icon symbols, click the Apply button.

- To add free text to a pedigree, you can Right click on the pedigree canvas and select Add Text from the drop-down menu. You can also select the Add Text menu button to add free text to your pedigree canvas.

- Headers & Footers:
- To change the Header or Footer for pedigrees, select the Properties button in the pedigree.

- Under Properties, select the Pedigree Here you will see the option to change the pedigree’s header/footer.

- To change the Header or Footer for pedigrees, select the Properties button in the pedigree.